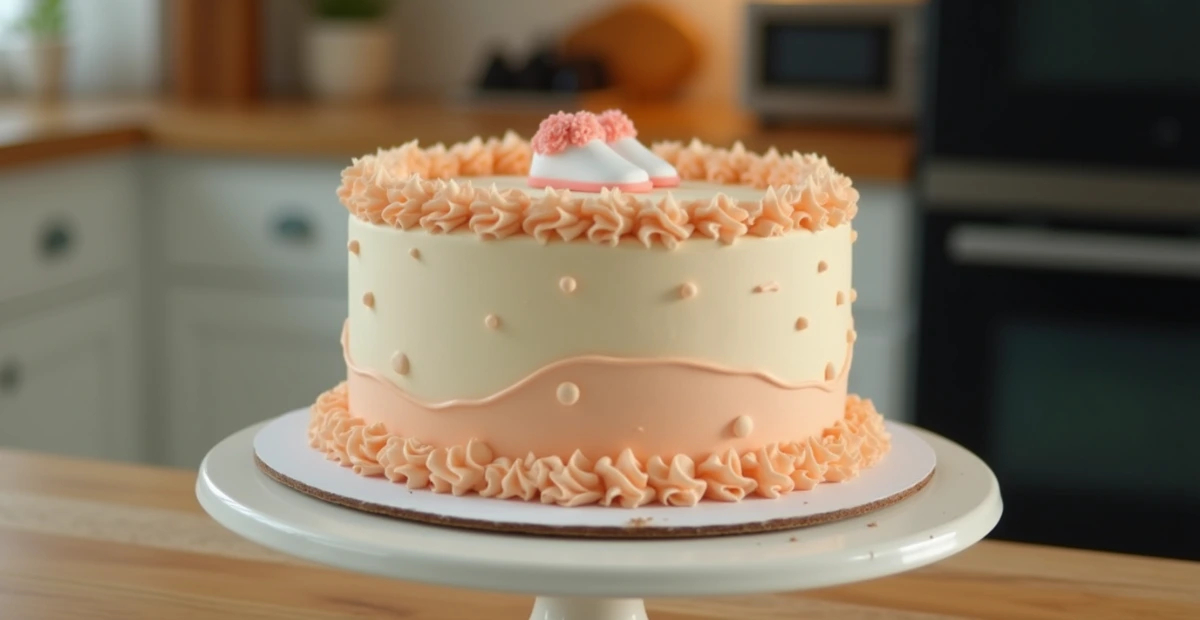
Planning a baby shower and want to impress your guests with a show-stopping dessert? Look no further than this DIY baby shower cake! Not only is it easy to make, but it also gives you the freedom to customize the flavors and decorations to fit your unique theme. Whether you’re a seasoned baker or just starting out, this simple recipe will guide you through each step to create a cake that’s as beautiful as it is delicious. Imagine the look on your guests’ faces when they see your homemade creation! Ready to dive in and make this special occasion even sweeter? Let’s get started!
Table of Contents
1. Key Benefits of a Baby Shower Cake
Baking a DIY baby shower cake comes with so many perks. Not only do you get to create a beautiful centerpiece for your celebration, but you also enjoy several other advantages that make this homemade treat so special.
- Personalized Touch: When you make your own baby shower cake, you can customize it to match the theme or color scheme of the party. Whether it’s soft pastels or vibrant hues, you can create a cake that perfectly fits your event’s vibe.
- Cost-Effective: Store-bought cakes can be pricey, especially if you’re looking for intricate designs. A DIY cake allows you to save money while still creating a stunning and delicious dessert. You can use affordable ingredients and still impress your guests with a professional-looking cake.
- Healthier Options: If you have specific dietary preferences or want to make a healthier option, making the cake yourself lets you choose ingredients like organic flour, less sugar, or even gluten-free or dairy-free alternatives. It’s all up to you!
- Endless Creative Possibilities: The best part about a DIY cake is the endless decorating possibilities. From fun fondant designs to simple buttercream swirls, you can experiment with different styles and make your cake as simple or elaborate as you like. The choice is yours.
- Satisfaction of Homemade: There’s something incredibly rewarding about serving a cake you’ve baked yourself. It’s not just a dessert—it’s a labor of love. Plus, seeing your guests enjoy your creation adds a personal touch that a store-bought cake just can’t provide.
Making your own baby shower cake combines creativity, fun, and practicality. Whether you’re an experienced baker or a beginner, it’s an opportunity to showcase your skills and make your celebration even more memorable. Ready to get started? Let’s dive into the ingredients!
2. Ingredients
To bake the perfect DIY baby shower cake, you’ll need some essential ingredients that come together to create a moist, flavorful base, as well as smooth frosting for a picture-perfect finish. Here’s what you’ll need:
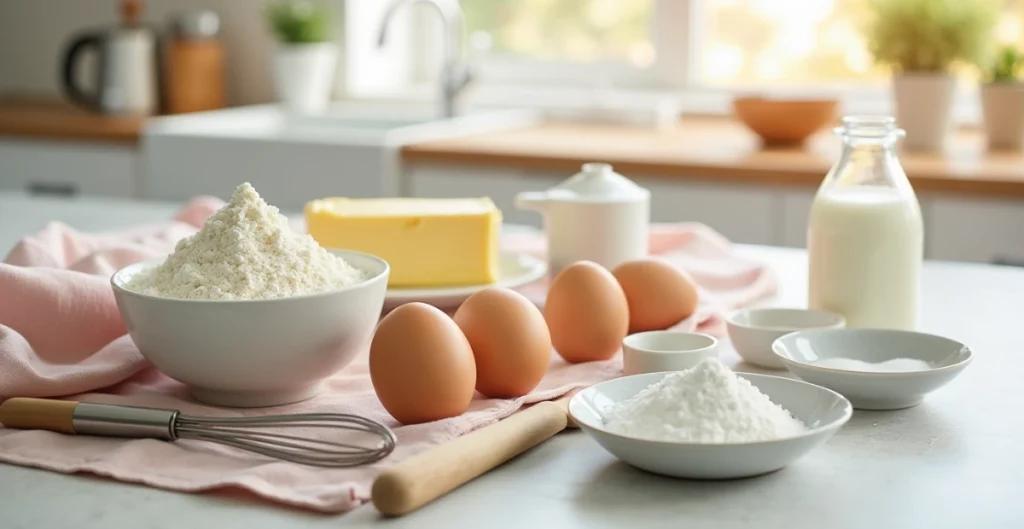
For the Cake:
- 2 ½ cups all-purpose flour: This is your base. It gives the cake structure and a light texture. If you prefer, you can swap it for gluten-free flour to accommodate dietary needs.
- 2 ½ tsp baking powder: This helps the cake rise and become fluffy.
- ½ tsp salt: Enhances the flavor and balances sweetness.
- 1 cup unsalted butter (room temperature): Butter adds moisture and richness to the cake. Make sure it’s soft for easier mixing.
- 1 ½ cups granulated sugar: This provides the right level of sweetness. You can substitute with coconut sugar if you prefer a more natural sweetener.
- 4 large eggs: Eggs help with structure and moisture. Let them come to room temperature before mixing for the best results.
- 2 tsp vanilla extract: This is the secret ingredient that adds depth of flavor. You can also use almond extract for a unique twist.
- 1 cup whole milk: Adds moisture and ensures your cake stays soft. You can also use almond milk or coconut milk if needed.
For the Frosting:
- 1 cup unsalted butter (room temperature): Just like for the cake, butter is key for a smooth and creamy frosting.
- 4 cups powdered sugar: This is your sweet base for the frosting. Sifting it before using will ensure a smooth texture.
- 2 tsp vanilla extract: Adds flavor to the frosting, complementing the cake.
- 2 tbsp heavy cream: This will give your frosting the perfect consistency. Adjust for a thicker or thinner frosting, depending on your preference.
Optional Decorations:
- Food coloring: Add a splash of color to your frosting to match your baby shower theme.
- Edible flowers or sprinkles: These small details bring your cake to life and make it look even more festive.
Tips for Success:
- Room Temperature Ingredients: Ensure your butter, eggs, and milk are at room temperature before you begin. This helps the ingredients mix together smoothly and evenly.
- Sifting Dry Ingredients: Sift your flour, baking powder, and salt together to prevent lumps and ensure a light, airy cake.
- Fresh Ingredients: Using fresh, quality ingredients will make a noticeable difference in the flavor and texture of your cake.
Now that you have everything you need, it’s time to bring it all together. Let’s move on to the next step and start baking your beautiful DIY baby shower cake!
3.Step-by-Step Instructions for Baking Your Baby Shower Cake
It’s time to bring your DIY baby shower cake to life! Follow these easy, step-by-step instructions to create a cake that’s not only delicious but also a visual masterpiece.
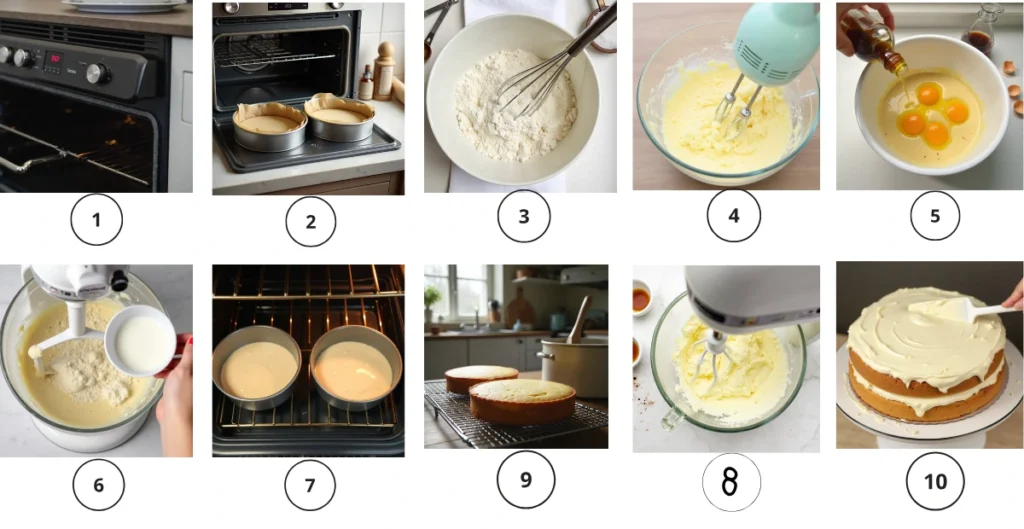
Step 1: Preheat Your Oven
- Preheat your oven to 350°F (175°C). Make sure it reaches the right temperature before you put your cake in this ensures even baking and a perfect rise.
Step 2: Prepare the Cake Pans
- Grease and flour two 9-inch round cake pans. If you want to make it even easier, you can line the pans with parchment paper. This will help the cake slide out smoothly once baked.
Step 3: Mix the Dry Ingredients
- In a medium-sized bowl, whisk together 2 ½ cups of all-purpose flour, 2 ½ tsp of baking powder, and ½ tsp of salt. Sifting the dry ingredients helps ensure there are no lumps and creates a smooth batter.
Step 4: Cream the Butter and Sugar
- In a large bowl, beat 1 cup of unsalted butter and 1 ½ cups of sugar together until the mixture is light and fluffy (about 3-5 minutes). This will help your cake become light and airy.
Step 5: Add the Eggs and Vanilla
- Add 4 large eggs, one at a time, mixing well after each addition. This ensures the eggs are fully incorporated. Then, stir in 2 tsp of vanilla extract, adding a lovely, sweet flavor.
Step 6: Combine the Dry and Wet Ingredients
- Gradually add the dry ingredients to the wet mixture, alternating with 1 cup of whole milk. Start with the dry ingredients and end with them. Mix until just combined. Be careful not to overmix, as this can make your cake dense.
Step 7: Bake the Cake
- Divide the batter evenly between the two prepared pans. Smooth the tops with a spatula to ensure an even bake. Bake for 25-30 minutes or until a toothpick inserted into the center comes out clean. Every oven is different, so start checking at 25 minutes.
Step 8: Let the Cake Cool
- Once baked, let the cakes cool in the pans for 10 minutes. Then, carefully turn them out onto a wire rack to cool completely. This cooling step is key to prevent the frosting from melting when applied.
Step 9: Make the Frosting
- While the cakes cool, it’s time to prepare the frosting. In a large bowl, beat 1 cup of butter until smooth. Gradually add 4 cups of powdered sugar, 2 tsp of vanilla extract, and 2 tbsp of heavy cream. Continue beating until the frosting is smooth and fluffy. Adjust the consistency by adding more cream for a thinner frosting or more sugar for a thicker one.
Step 10: Assemble the Cake
- Place one layer of cake on your serving plate. Spread a generous layer of frosting on top. Place the second layer on top, and cover the entire cake with frosting. Smooth the edges and top for a neat finish.
Step 11: Decorate
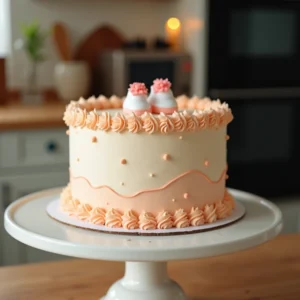
- Now, for the fun part decorating! You can add food coloring to your frosting to match the theme of your baby shower, or you can pipe a simple border or design around the cake. For a professional touch, consider adding edible flowers, sprinkles, or other fun baby-themed decorations.
Pro Tip:
- For a unique touch, try a naked cake look. Frost only the top and the center, leaving the sides exposed. It’s a trendy, rustic style that’s easy to create and still looks stunning.
Now, sit back and admire your beautiful DIY baby shower cake! With these simple steps, you’ve created a delicious treat that’s sure to be the highlight of your celebration. Enjoy the baking process, and don’t forget to have fun with the decorating!
4. Pro Tips and Variations
Now that you’ve mastered the basic recipe, let’s explore some pro tips and variations to take your DIY baby shower cake to the next level. Whether you’re looking to customize the flavors or try unique decorating ideas, these tips will help you create a memorable cake your guests will love!
1. Flavor Variations
- Lemon Zest Cake: For a light and refreshing twist, add 1 tbsp of lemon zest to the batter. It pairs beautifully with vanilla frosting and is perfect for a spring or summer baby shower.
- Chocolate Cake: Swap the flour for cocoa powder (about ½ cup) and reduce the amount of sugar slightly. This creates a rich, decadent chocolate cake that will satisfy any sweet tooth.
- Spice Cake: Add 1 tsp cinnamon, ½ tsp nutmeg, and ¼ tsp ground ginger to the dry ingredients for a warm, spiced flavor. This variation is great for fall baby showers.
2. Frosting Variations
- Cream Cheese Frosting: For a tangy contrast to the sweetness of the cake, substitute part of the butter with cream cheese. Use 1 cup of butter and 8 oz of cream cheese, then continue with the powdered sugar and vanilla extract as usual.
- Whipped Cream Frosting: If you’re looking for a lighter, fluffier frosting, whip 1 ½ cups heavy cream with 2 tbsp powdered sugar until stiff peaks form. This creates a delicate frosting that’s less sweet but still delicious.
3. Decorating Ideas
- Fresh Flowers: For a natural, elegant look, decorate your cake with fresh flowers. Choose edible flowers like pansies, violets, or marigolds for a vibrant touch. Simply place them on top of the cake or around the edges.
- Sprinkles and Confetti: If you’re aiming for a playful vibe, sprinkle colorful confetti or themed baby shower sprinkles around the cake. It’s an easy way to make your cake fun and visually appealing.
- Fondant Decorations: If you’re up for a challenge, try using fondant to create custom decorations like baby booties, onesies, or little animals. Fondant allows for intricate designs and can make your cake look professionally made.
4. Troubleshooting Tips
- Cake Won’t Rise? If your cake doesn’t rise as expected, make sure your baking powder is fresh. If it’s old, it won’t give the cake the lift it needs. Also, avoid overmixing the batter, as this can make the cake dense.
- Frosting Too Thin or Thick? If your frosting is too thin, simply add more powdered sugar to thicken it. If it’s too thick, add a little more cream to reach the right consistency. You want it spreadable but not runny.
5. Storage Tips
- Cake Storage: If you’re making your cake ahead of time, store it in an airtight container at room temperature for up to 3 days. You can also freeze the layers wrapped tightly in plastic wrap and foil for up to 3 months. Just thaw them overnight before frosting and serving.
- Frosting Storage: Leftover frosting can be stored in the fridge for up to 5 days. When ready to use, let it come to room temperature before spreading it on the cake.
Pro Tip:
- Cake Decorating Tools: If you plan on doing intricate piping or designs, invest in a few piping tips and decorating bags. They’re affordable and make your decorating process much easier and more professional-looking.
By experimenting with different flavors, frostings, and decorations, you can customize this DIY baby shower cake to suit any theme or personal taste. The possibilities are endless, and with these pro tips, your cake is sure to impress!
5. Serving Suggestions for Your Baby Shower Cake
Now that your DIY baby shower cake is all decorated and ready, let’s talk about how to serve it! Whether you’re hosting a small gathering or a larger event, presentation is key to making your cake even more special. Here are some tips and ideas for serving your cake in a way that’ll wow your guests.
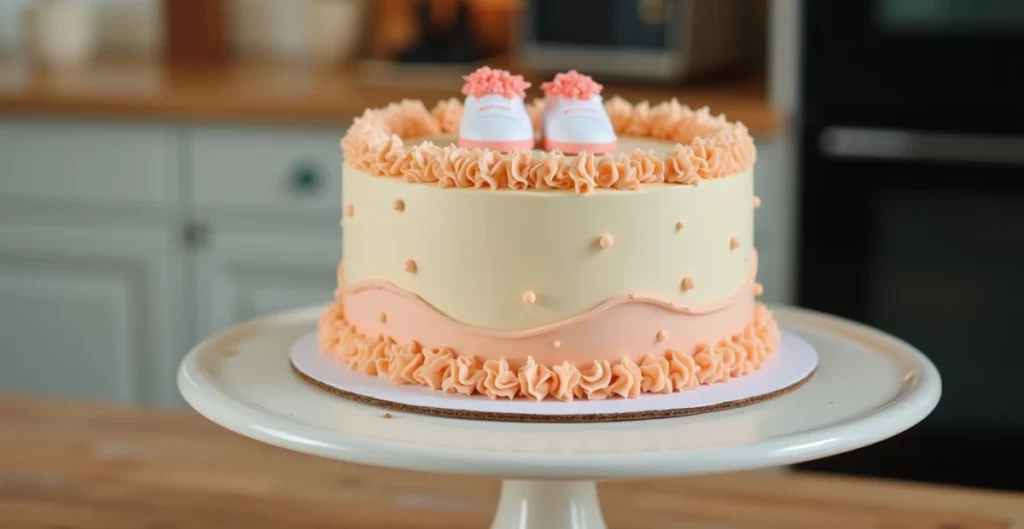
1. Cake Presentation Ideas
- Simple Cake Stand: A classic cake stand is a must for displaying your beautiful creation. It elevates the cake and adds a touch of elegance. If you don’t have a cake stand, a large, flat platter works just as well.
- Tiered Display: If you’re making multiple cakes, consider stacking them on a tiered cake stand. This is a great option for larger gatherings and adds drama to the presentation.
- Platter with Edible Flowers: Place the cake on a simple platter and surround it with edible flowers like pansies, violets, or even mint leaves. This adds color and texture, giving your cake a natural, fresh look.
2. Serving Portions
- Cutting the Cake: For even portions, use a serrated knife to cut the cake slowly, and wipe the knife clean between cuts. This ensures each piece has smooth edges.
- Individual Servings: If you want a more personalized touch, consider serving individual cake slices on small plates. Top each slice with a dollop of whipped cream or a few sprinkles for a festive feel.
3. Pairing Suggestions
- Beverage Pairings: A baby shower cake pairs beautifully with a range of beverages. Serve with a light tea, a sparkling lemonade, or even a mocktail for guests who prefer non-alcoholic options.
- Fresh Fruit: To balance the sweetness of the cake, serve it with fresh fruit like berries, grapes, or sliced citrus. This adds a refreshing, slightly tart element that complements the cake perfectly.
- Ice Cream or Sorbet: If you want to add a fun touch, serve the cake alongside a scoop of vanilla ice cream or a refreshing fruit sorbet. The contrast between the cake’s richness and the cold, fruity sorbet is a winning combination.
4. Creative Presentation for Baby Showers
- Baby-Themed Decorations: If you’ve used a theme for your cake, carry it through to the way you serve it. For example, use baby bottle or baby shoe toppers for a whimsical touch. You can even place small baby figurines around the cake for added charm.
- Cake Bites or Mini-Cakes: If you’re looking for something more modern and convenient, consider cutting your cake into small cake bites or making mini cakes. These are easy to serve and give guests a fun, personalized treat.
Pro Tip:
- Serving the Cake at the Right Temperature: Let your cake sit at room temperature for about 30 minutes before serving. This allows the flavors to develop fully and ensures the frosting is perfectly smooth and creamy.
With these serving suggestions, your DIY baby shower cake will not only taste amazing but look stunning on any table. Whether you go for a simple yet elegant display or get creative with mini cakes and themed decorations, your guests will appreciate the effort you’ve put into making this cake extra special. Enjoy the celebration and the delicious cake you’ve made!
6. Conclusion
Congratulations, you’ve just created a stunning DIY baby shower cake that’s sure to be the star of your celebration! Whether it’s your first time baking or you’re a seasoned pro, this easy-to-follow recipe has helped you bring together all the elements for a delicious, customizable cake that matches the spirit of the occasion. Let’s recap why this cake is a great choice:
Why This Cake is Perfect for Your Baby Shower:
- Customizable: From flavor variations to creative decorations, this cake is easy to personalize for your unique baby shower theme.
- Simple to Make: With straightforward instructions and easy-to-find ingredients, even beginners can create a beautiful cake without stress.
- Delicious and Beautiful: Not only does this cake taste amazing, but it also looks like something you’d find at a professional bakery without the hefty price tag.
By following the steps and tips provided, you’ve learned how to bake, frost, and decorate a cake that’s both fun and functional. Whether you choose to serve it alongside refreshing drinks or as part of a grand dessert spread, this cake will surely delight your guests and make the celebration even more memorable.
Final Thoughts:
Baking a cake from scratch is a rewarding experience, and when it’s for a special occasion like a baby shower, it’s even more meaningful. You’ve put your heart and creativity into it, and that’s what makes your cake truly unique. Enjoy the process, take pride in your creation, and most importantly, have fun!
Don’t forget to snap a photo before serving you’ll want to remember this moment, and so will your guests! Enjoy the celebration, and let this cake be the sweet touch that brings everyone together.
Baby Shower Cake
Ingredients
For the Cake:
- 2 ½ cups all-purpose flour: This is your base. It gives the cake structure and a light texture. If you prefer you can swap it for gluten-free flour to accommodate dietary needs.
- 2 ½ tsp baking powder: This helps the cake rise and become fluffy.
- ½ tsp salt: Enhances the flavor and balances sweetness.
- 1 cup unsalted butter room temperature: Butter adds moisture and richness to the cake. Make sure it’s soft for easier mixing.
- 1 ½ cups granulated sugar: This provides the right level of sweetness. You can substitute with coconut sugar if you prefer a more natural sweetener.
- 4 large eggs: Eggs help with structure and moisture. Let them come to room temperature before mixing for the best results.
- 2 tsp vanilla extract: This is the secret ingredient that adds depth of flavor. You can also use almond extract for a unique twist.
- 1 cup whole milk: Adds moisture and ensures your cake stays soft. You can also use almond milk or coconut milk if needed.
For the Frosting:
- 1 cup unsalted butter room temperature: Just like for the cake, butter is key for a smooth and creamy frosting.
- 4 cups powdered sugar: This is your sweet base for the frosting. Sifting it before using will ensure a smooth texture.
- 2 tsp vanilla extract: Adds flavor to the frosting complementing the cake.
- 2 tbsp heavy cream: This will give your frosting the perfect consistency. Adjust for a thicker or thinner frosting depending on your preference.
Optional Decorations:
- Food coloring: Add a splash of color to your frosting to match your baby shower theme.
- Edible flowers or sprinkles: These small details bring your cake to life and make it look even more festive.
Tips for Success:
- Room Temperature Ingredients: Ensure your butter eggs, and milk are at room temperature before you begin. This helps the ingredients mix together smoothly and evenly.
- Sifting Dry Ingredients: Sift your flour baking powder, and salt together to prevent lumps and ensure a light, airy cake.
- Fresh Ingredients: Using fresh quality ingredients will make a noticeable difference in the flavor and texture of your cake.
Instructions
Step 1: Preheat Your Oven
- Preheat your oven to 350°F (175°C). Make sure it reaches the right temperature before you put your cake in this ensures even baking and a perfect rise.
Step 2: Prepare the Cake Pans
- Grease and flour two 9-inch round cake pans. If you want to make it even easier, you can line the pans with parchment paper. This will help the cake slide out smoothly once baked.
Step 3: Mix the Dry Ingredients
- In a medium-sized bowl, whisk together 2 ½ cups of all-purpose flour, 2 ½ tsp of baking powder, and ½ tsp of salt. Sifting the dry ingredients helps ensure there are no lumps and creates a smooth batter.
Step 4: Cream the Butter and Sugar
- In a large bowl, beat 1 cup of unsalted butter and 1 ½ cups of sugar together until the mixture is light and fluffy (about 3-5 minutes). This will help your cake become light and airy.
Step 5: Add the Eggs and Vanilla
- Add 4 large eggs, one at a time, mixing well after each addition. This ensures the eggs are fully incorporated. Then, stir in 2 tsp of vanilla extract, adding a lovely, sweet flavor.
Step 6: Combine the Dry and Wet Ingredients
- Gradually add the dry ingredients to the wet mixture, alternating with 1 cup of whole milk. Start with the dry ingredients and end with them. Mix until just combined. Be careful not to overmix, as this can make your cake dense.
Step 7: Bake the Cake
- Divide the batter evenly between the two prepared pans. Smooth the tops with a spatula to ensure an even bake. Bake for 25-30 minutes or until a toothpick inserted into the center comes out clean. Every oven is different, so start checking at 25 minutes.
Step 8: Let the Cake Cool
- Once baked, let the cakes cool in the pans for 10 minutes. Then, carefully turn them out onto a wire rack to cool completely. This cooling step is key to prevent the frosting from melting when applied.
Step 9: Make the Frosting
- While the cakes cool, it’s time to prepare the frosting. In a large bowl, beat 1 cup of butter until smooth. Gradually add 4 cups of powdered sugar, 2 tsp of vanilla extract, and 2 tbsp of heavy cream. Continue beating until the frosting is smooth and fluffy. Adjust the consistency by adding more cream for a thinner frosting or more sugar for a thicker one.
Step 10: Assemble the Cake
- Place one layer of cake on your serving plate. Spread a generous layer of frosting on top. Place the second layer on top, and cover the entire cake with frosting. Smooth the edges and top for a neat finish.
Step 11: Decorate
- Now, for the fun part decorating! You can add food coloring to your frosting to match the theme of your baby shower, or you can pipe a simple border or design around the cake. For a professional touch, consider adding edible flowers, sprinkles, or other fun baby-themed decorations.
Pro Tip:
- For a unique touch, try a naked cake look. Frost only the top and the center, leaving the sides exposed. It’s a trendy, rustic style that’s easy to create and still looks stunning.
Notes
Nutrition Information (Per Serving):
- Calories: 375
- Fat: 18g
- Saturated Fat: 10g
- Carbohydrates: 50g
- Sugar: 40g
- Protein: 3g
- Fiber: 1g
- Cholesterol: 50mg
- Sodium: 200mg
- Calcium: 30mg
- Iron: 1mg
7. FAQs : Everything You Need to Know About baby shower cake
When making a DIY baby shower cake, it’s natural to have a few questions along the way. Don’t worry, we’ve got you covered! Here are answers to some common questions that might pop up as you bake and decorate your cake, along with a few helpful tips to ensure everything turns out perfectly.
1. Can I make the cake in advance?
Yes! You can bake the cake layers up to two days ahead of time. Once they’ve completely cooled, wrap them tightly in plastic wrap and store them at room temperature. If you need to store them longer, you can freeze the layers for up to three months. Just make sure to thaw them fully at room temperature before frosting.
2. What if my frosting is too thick?
If your frosting is too thick to spread easily, try adding a little more heavy cream or milk, one tablespoon at a time. If it’s still not spreading smoothly, you can use a handheld whisk to beat it for a couple of minutes to achieve a lighter consistency. Make sure your butter is softened fully before mixing to avoid lumps.
3. Can I use a different flour for this cake?
Yes, you can use cake flour for an even lighter texture. If you’re looking for a gluten-free option, gluten-free flour blends work well as substitutes. However, depending on the blend, you may need to adjust the proportions of liquid to achieve the right consistency.
4. What are some good egg substitutes?
If you need an egg-free cake, you can use one of these substitutes for each egg:
¼ cup unsweetened applesauce
½ mashed banana
¼ cup of yogurt These ingredients help maintain the cake’s moisture while giving it the right texture and flavor.
5. How should I store leftovers?
Store any leftover cake in an airtight container at room temperature for up to 3 days. If you want to keep it longer, wrap the cake tightly in plastic wrap and refrigerate for up to a week. For optimal freshness, let the cake come to room temperature before serving so that the frosting stays smooth.
6. Can I make cupcakes instead of a full cake?
Yes, you can easily turn this recipe into cupcakes! Simply fill cupcake liners about two-thirds full and bake at the same temperature for about 18-22 minutes. Keep an eye on them, and use a toothpick to check for doneness.
7. How can I make the cake more flavorful?
For added flavor, consider adding citrus zest (like lemon, orange, or lime) or a splash of almond extract to the batter. These subtle additions can bring a fresh twist to your cake without overpowering the main flavors.
8. What should I do if the cake sinks in the middle?
A sunken cake can happen if the oven temperature is too low or if the cake isn’t baked long enough. To prevent this, make sure your oven is fully preheated before baking. Avoid opening the oven door while the cake is baking, as this can cause the temperature to drop. Also, check your baking powder’s expiration date to ensure it’s still active.
Pro Tip:
- If your frosting becomes too runny after mixing, try refrigerating it for about 20-30 minutes before applying it to the cake. Chilled frosting sets better and is easier to work with when you’re decorating.
Baking a baby shower cake doesn’t have to be complicated. These tips and answers should help guide you through the process, whether you’re a beginner or an experienced baker. Keep these helpful answers in mind, and feel free to get creative with flavors and decorations. Your cake is going to be amazing just trust the process and enjoy every moment!

