
Are you ready to bake the perfect cake that will make your graduation celebration truly unforgettable? A beautiful graduation cake isn’t just a dessert it’s a centerpiece that adds joy, color, and personal touch to your big day. Whether you’re celebrating a high school, college, or even a kindergarten graduation, the right cake can make all the difference in creating lasting memories. From creative graduation-themed decorations to indulgent cake flavors and fillings, there are endless ways to make your cake as unique as the graduate themselves.
In this recipe, we’ll guide you through creating a stunning graduation cake that’s not only delicious but also a visual showstopper. No matter your baking experience, this recipe is designed to help you craft a cake that will leave everyone talking. So, grab your apron, and let’s dive into making a cake that’s as special as the milestone you’re celebrating!
Table of Contents
1. Key Benefits of a Graduation Cake
Baking a graduation cake is more than just a fun way to mark the occasion it’s a meaningful addition to your celebration that will have everyone talking. Let’s take a moment to explore why a beautifully decorated graduation cake is such a great choice for your big day.
A Personalized Touch
One of the most exciting benefits of a graduation cake is the ability to make it uniquely yours. Whether you’re opting for a traditional theme with school colors or getting creative with custom decorations, your cake can reflect the personality of the graduate. Adding elements like their favorite colors, hobbies, or even a personalized graduation topper can make the cake feel extra special.
A Showstopper at the Party
A stunning graduation-themed cake isn’t just for eating it’s an eye-catching centerpiece for your dessert table. Imagine the joy on your guests’ faces when they see the intricate details, from edible diplomas to fondant graduation caps. Not only does it taste amazing, but it also sparks conversation and adds charm to your celebration.
Versatility for All Tastes
Another reason to love a graduation cake is the wide range of flavors and designs you can choose from. Whether you’re baking for a chocolate lover, a fruit fanatic, or someone who craves something classic like vanilla, there’s a flavor that will satisfy everyone. And if you have guests with dietary restrictions, you can easily modify the recipe to make it gluten-free, dairy-free, or vegan, ensuring that no one misses out on the fun.
Memorable Keepsake
A well-decorated graduation cake can become a cherished keepsake. You might even find yourself taking photos of it before anyone cuts into it. It’s a beautiful way to capture the memories of this important milestone. After all, a graduation is a once-in-a-lifetime event, and a cake that ties into that celebration will make the moment even more unforgettable.
These are just a few of the reasons why a graduation cake should be part of your celebration. Now that you know its benefits, let’s dive into how you can make your own. Whether you’re a novice baker or an experienced pro, the perfect cake is just a few steps away!
2. Ingredients for the Perfect Graduation Cake
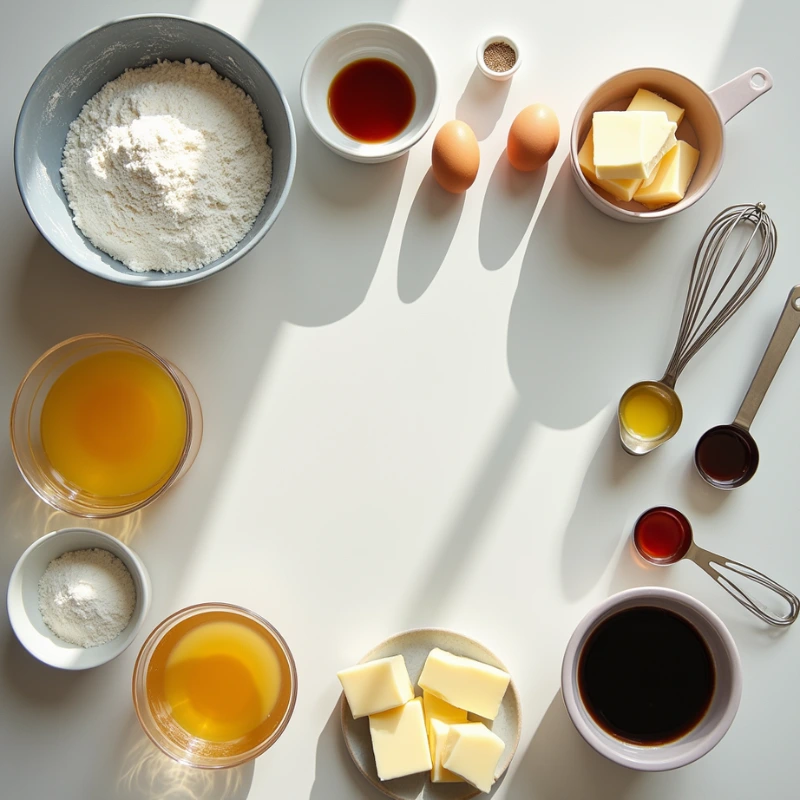
Now that you’re excited to make your graduation cake, let’s gather everything you’ll need. Whether you’re aiming for a classic flavor or something a bit more adventurous, these ingredients are the foundation for a cake that’s as delicious as it is beautiful. Here’s what you’ll need to get started:
For the Cake:
- 2 ½ cups all-purpose flour
The base of your cake. You can use cake flour for a finer texture, but all-purpose works perfectly well for a sturdy yet tender cake. - 2 ½ teaspoons baking powder
This will help your cake rise and get that light, fluffy texture that’s perfect for layering. - 1 teaspoon salt
To balance out the sweetness and enhance the flavors. - 1 cup unsalted butter, softened
The richness of butter is key to achieving a moist, flavorful cake. Make sure it’s softened for easy mixing. - 2 cups granulated sugar
Sweetness is the star here, but don’t worry, the frosting will balance things out beautifully. - 4 large eggs
Eggs help bind everything together and provide moisture and structure. - 1 tablespoon vanilla extract
For that subtle, comforting flavor that pairs so well with any cake. - 1 cup whole milk
The milk adds moisture and a tender crumb to the cake, so don’t skimp here.
For the Frosting:
- 1 ½ cups unsalted butter, softened
Yes, more butter! This makes the frosting creamy and luxurious. - 4 cups powdered sugar
Sweet and fluffy frosting requires powdered sugar for that smooth, spreadable consistency. - 2 teaspoons vanilla extract
You can’t go wrong with the comforting taste of vanilla in the frosting. - 2-3 tablespoons heavy cream or whole milk
This helps adjust the consistency of the frosting, making it easy to spread and pipe.
For Decoration:
- Fondant or Buttercream (your choice)
You can decorate with either fondant for a sleek, smooth finish or buttercream for a softer, homemade look. Both will work perfectly for creating a gorgeous graduation cap or other themed decorations. - Graduation-themed cake toppers (optional)
If you want to take your decoration game to the next level, add some fun graduation-themed cake toppers like tiny diplomas or a mortarboard cap. This adds a personal, celebratory touch to your cake. - Sprinkles, edible glitter, or fresh flowers
For a bit of extra sparkle, you can top your cake with a sprinkle of edible glitter or fresh flowers, making it look even more festive and eye-catching.
Pro Tip:
If you’re looking to get creative, you can switch up the flavors! Try adding cocoa powder for a chocolate cake or a bit of lemon zest for a light, zesty twist. You can even use your favorite cake mix to save time while still achieving impressive results.
With these ingredients in hand, you’re ready to bring your graduation cake to life. Keep reading for step-by-step instructions to create a show-stopping dessert that everyone will remember. Let’s get baking!
3. Instructions for Baking Your Graduation Cake
Now that you’ve gathered all your ingredients, it’s time to get baking! Follow these simple steps to create a graduation cake that’s not only delicious but also visually stunning. Don’t worry if it feels like a lot to take in at once; we’ll guide you through each step with plenty of tips to ensure success.
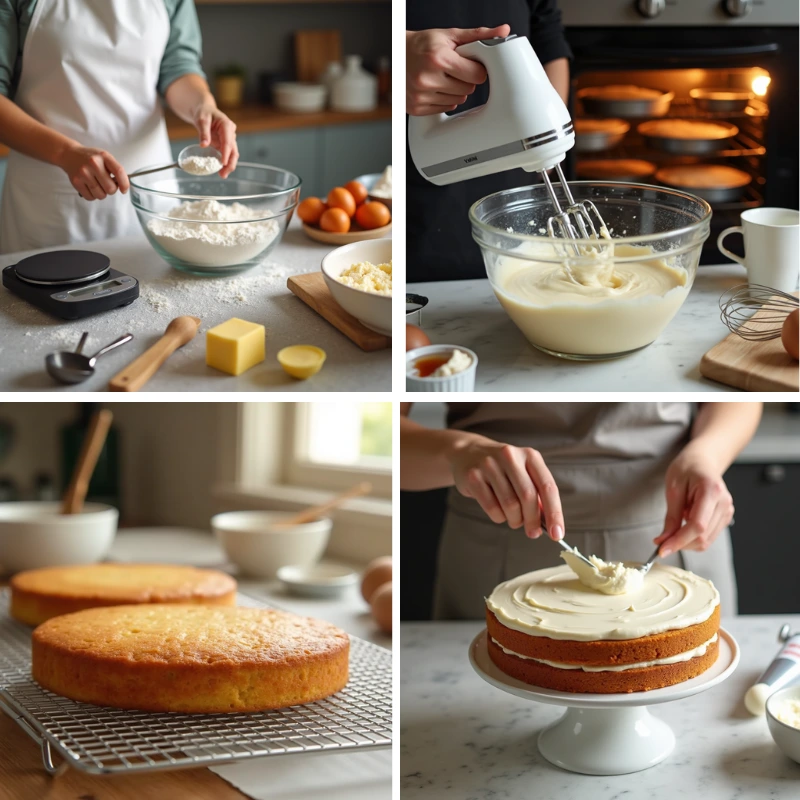
Step 1: Prep Your Pans and Preheat the Oven
Before you begin mixing, it’s important to prep your baking tools. Start by preheating your oven to 350°F (175°C). This ensures your cake bakes evenly. Next, grease your cake pans with butter and lightly dust them with flour, or line them with parchment paper. This prevents your cake from sticking and makes for an easy release once baked.
Step 2: Mix Your Cake Batter
In a large mixing bowl, cream together the softened unsalted butter and granulated sugar until the mixture is light and fluffy. This should take about 3-4 minutes with an electric mixer on medium speed. Once creamy, add the eggs, one at a time, mixing well after each addition. Make sure the eggs are fully incorporated before adding the next.
Next, sift your cake flour and baking powder together in a separate bowl to ensure they are evenly distributed. Gradually add the dry ingredients to the wet mixture, alternating with whole milk. Start and end with the dry ingredients. Mix gently until the batter is smooth and fully combined don’t overmix!
Step 3: Bake the Cake Layers
Divide the batter evenly between your prepared cake pans. Use a spatula to smooth the tops. Bake in your preheated oven for 25-30 minutes, or until a toothpick inserted into the center of the cakes comes out clean. Every oven is different, so start checking around 20 minutes to avoid overbaking. Once done, remove the cakes from the oven and allow them to cool in the pans for 10 minutes. Then, turn them out onto a wire rack to cool completely.
Step 4: Make the Buttercream Frosting
While the cakes are cooling, let’s get started on the frosting. In a large bowl, beat together the softened unsalted butter and powdered sugar until smooth and creamy. Add a pinch of salt to balance the sweetness. Gradually add heavy cream and vanilla extract, beating until the frosting reaches your desired consistency smooth, fluffy, and spreadable.
For a more stable frosting (great for decorating), add more powdered sugar. For a softer texture, add a little more cream. If you want to get a little creative, you can tint the frosting with food coloring to match the graduation theme or even use different shades for a multi-colored effect.
Step 5: Assemble Your Graduation Cake
Now for the fun part assembly! Place the first layer of your cooled cake on a serving platter or cake board. Spread a generous layer of frosting on top, smoothing it out to the edges. Add the second cake layer and gently press down to level it. Frost the top and sides of the cake, smoothing it out as you go.
If you want a more polished look, you can use a fondant covering for a sleek finish, or pipe decorative borders with your frosting for a more textured effect. Be sure to have fun with it and personalize the design. This is your chance to get creative and make the cake truly special for the graduate.
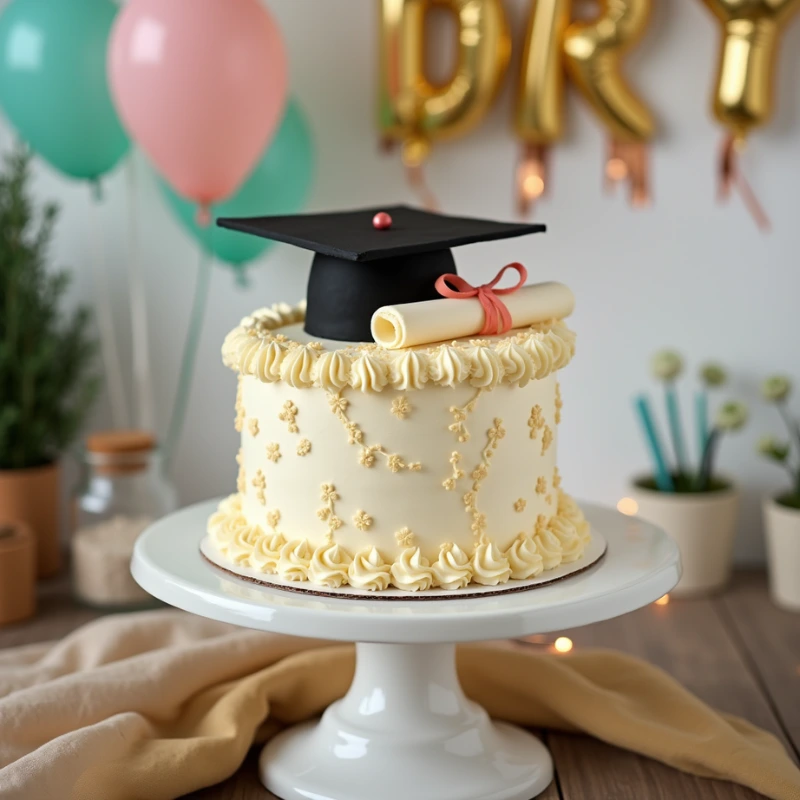
Step 6: Decorate with Graduation Touches
Once your cake is frosted, it’s time for the graduation-themed decorations. You can use fondant to create graduation caps, scrolls, or even the year of graduation in numbers. A sprinkle of edible glitter or gold leaf adds a touch of elegance. For an extra personal touch, top the cake with a custom graduation topper perhaps the graduate’s name, school logo, or a fun quote about the next chapter.
And there you have it! A beautiful, delicious graduation cake ready to take center stage at your celebration. Remember, this recipe is just a starting point feel free to tweak it to suit your style and tastes. Whether you’re a seasoned baker or a first-timer, following these steps will help you craft a cake that’s as memorable as the graduation day itself. Enjoy the process and, of course, the cake!
4. Pro Tips and Variations for the Perfect Graduation Cake
Ready to take your graduation cake to the next level? Whether you want to add a personal twist or just want to ensure your cake turns out flawless, these pro tips and variations will help you elevate your baking game and create a showstopping dessert.
Pro Tips for Baking Success
- Room Temperature Ingredients: One of the most important things to remember when baking your graduation cake is to ensure your butter, eggs, and milk are at room temperature. This helps everything mix together more evenly, creating a smooth batter and a fluffier cake.
- Don’t Overmix the Batter: When you add the dry ingredients to the wet, mix just until everything is incorporated. Overmixing can cause your cake to be dense, and no one wants a heavy cake at a celebration! Stir gently and stop once you see a smooth, lump-free batter.
- Even Cake Layers: To make sure your cake layers bake evenly, use an ice cream scoop or measuring cup to divide the batter between your pans. This ensures that each layer has the same amount of batter, helping them bake at the same rate.
- Use a Toothpick to Test for Doneness: Instead of relying solely on time, check if your cake is done by inserting a toothpick into the center of each layer. If it comes out clean or with just a few crumbs, your cake is ready to come out of the oven!
- Chill Your Frosting: After you’ve made your buttercream frosting, chill it for about 15-20 minutes before frosting the cake. This makes it easier to spread and pipe, and it will hold its shape better, especially if you’re aiming for a smooth finish.
Creative Variations to Try
- Flavor Combinations: While vanilla is always a classic, why not add a bit of flair to your cake? You can experiment with other flavors such as:
- Chocolate: Swap half the flour for cocoa powder to create a rich chocolate cake. You can also layer it with a chocolate ganache filling for an extra indulgent treat.
- Lemon or Orange: Add zest to your batter for a light, citrusy flavor that pairs wonderfully with a tangy cream cheese frosting.
- Strawberry: Incorporate fresh strawberry puree into the batter for a fruity twist that’s perfect for spring or summer graduations.
- Frosting Options: While buttercream is a go-to choice for most cakes, there are several other frosting options to consider:
- Cream Cheese Frosting: If you want something a little less sweet and more tangy, cream cheese frosting is an excellent choice. It pairs well with fruity cakes like lemon or strawberry.
- Whipped Cream Frosting: For a lighter option, try whipped cream frosting. It’s less sweet and adds a soft, fluffy texture, perfect if you’re going for a more delicate finish.
- Fondant: If you’re aiming for a sleek, polished look with intricate decorations, fondant is the way to go. It’s perfect for creating smooth surfaces and shaping decorations like graduation caps, diplomas, or even school mascots.
- Decorative Elements: Decorating your cake can be just as fun as baking it! Here are a few ideas:
- Themed Toppers: Consider using a custom graduation topper that reflects the graduate’s achievements maybe their name, graduation year, or even their alma mater’s logo. It adds a personal touch.
- Edible Flowers: For a more elegant look, use fresh edible flowers to decorate the cake. They’re especially lovely for spring and summer graduations.
- Piping Designs: Get creative with your piping! You can use piping tips to create elegant borders, rosettes, or even fun designs like stars or scrolls. Don’t forget to add some sparkle with edible glitter or gold leaf for a touch of glamour.
Serving and Storing Your Cake
- Serving Size: Depending on the size of your cake, plan for about 12-16 servings. If you’ve made a multi-tiered cake, you can serve smaller slices while still impressing your guests with the grand display.
- Storage Tips: If you have leftovers (lucky you!), store the cake in an airtight container at room temperature for up to 2-3 days. If you’ve used cream cheese or whipped cream frosting, it’s best to refrigerate it to keep it fresh. If you’ve decorated with fondant, it can last longer at room temperature as long as it’s kept dry and away from humidity.
With these pro tips and creative variations, you’ll be able to customize your graduation cake to perfectly match the occasion. Whether you’re sticking to a classic design or thinking outside the box, these tweaks will ensure your cake looks and tastes incredible. Ready to dive in and make this cake your own? Let’s get baking!
5. Serving Suggestions for Your Graduation Cake
Once your graduation cake is beautifully baked and decorated, it’s time to think about how to present and serve it! A well-served cake can elevate the entire celebration, making it not only delicious but also a visual treat. Here are some thoughtful serving suggestions to help you make the most of your graduation cake and wow your guests.
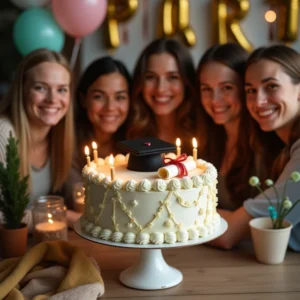
1. Displaying the Cake
- Cake Stand: A simple, elegant cake stand is one of the best ways to display your cake. It adds height and draws attention to your masterpiece, creating a focal point on your dessert table.
- Themed Decor: Surround the cake with small graduation-themed decorations like mini diplomas, graduation caps, or confetti. These touches help tie the cake into the overall theme of the celebration and make the dessert table look cohesive.
- Fresh Flowers or Greenery: For a fresh, vibrant touch, consider decorating your cake display with fresh flowers or greenery. This works especially well for outdoor or garden-themed graduation parties. Choose flowers that complement your cake’s design and color palette, like white roses or lavender for a soft, elegant look.
2. Serving the Cake
- Cutting the Cake: When it’s time to cut, ensure your knife is sharp to make clean slices. If you’ve used fondant or a thick frosting layer, warm the knife under hot water and dry it between cuts to maintain neat slices.
- Portion Sizes: Plan for about 12-16 servings if you’re making a standard 9-inch round cake. If you’ve made a larger tiered cake, you can serve smaller slices to keep it festive and allow guests to sample different flavors.
- Cake Plates and Forks: Use beautiful cake plates and forks to add an extra layer of elegance when serving your cake. For a fun touch, personalize the plates with the graduate’s name or school colors if you’re hosting a larger event.
3. Pairing with Drinks
- Coffee: A warm, rich cup of coffee pairs wonderfully with a graduation cake, especially if you’ve made a chocolate or coffee-flavored cake. Consider offering a selection of coffee options like espresso, cappuccino, or cold brew.
- Champagne or Prosecco: If you want to add some sparkle to your celebration, serve slices of cake with a glass of bubbly! Champagne or Prosecco enhances the celebratory vibe and cuts through the richness of the frosting.
- Mocktails: For non-drinkers or younger guests, a refreshing mocktail is a great option. Serve something like a berry lemonade or sparkling apple cider both flavors complement cake beautifully.
4. Accompanying Treats
- Cupcakes: For an extra sweet touch, serve cupcakes alongside your cake. These are perfect for guests who want a smaller portion or for kids to enjoy. You can decorate them to match the cake, using the same frosting and graduation-themed toppers.
- Cookies: If you’re going all out with the dessert table, consider offering some fun graduation-themed cookies. They’re easy to make and can be shaped like books, hats, or diplomas, adding variety and flavor to the table.
- Fruit: Fresh fruit like strawberries, raspberries, or even tropical fruit like pineapple or mango can balance out the sweetness of the cake. Arrange the fruit around the cake for a colorful, fresh display.
5. Storing Leftovers
- Room Temperature: If your graduation cake has buttercream or fondant frosting and will be eaten within a couple of days, it’s perfectly fine to store it at room temperature in an airtight container.
- Refrigeration for Freshness: If you used cream cheese or whipped cream frosting, refrigerate the cake to keep it fresh for longer. Just make sure to cover it properly so the frosting doesn’t dry out.
- Freezing: Did you make extra cake or have some leftover slices? No problem! You can freeze your graduation cake for up to 3 months. Wrap it in plastic wrap and foil, then place it in an airtight container to prevent freezer burn. When you’re ready to serve it, let it thaw at room temperature for a few hours.
These serving suggestions will ensure that your graduation cake looks as good as it tastes, while making your guests feel special and indulged. From the way you present the cake to the drinks and treats that accompany it, every detail helps to elevate the celebration. Enjoy the process and, most importantly, the sweet memories you’ll create with this show-stopping dessert!
6. Conclusion: Why a Graduation Cake is the Perfect Celebration Treat
There’s no better way to mark a major milestone than with a beautifully baked graduation cake. From the joy of baking to the fun of decorating, this cake becomes more than just a dessert it’s a centerpiece, a conversation starter, and a way to make the day feel even more special. Whether you’re celebrating a high school graduate, a college graduate, or anyone crossing the stage, a custom-designed cake adds that extra touch of personalization to the occasion.
As you’ve seen in this guide, baking a graduation cake doesn’t have to be overwhelming. With the right ingredients, some simple tips, and a little creativity, you can create a stunning and delicious treat that will be the highlight of the party. And with endless possibilities for flavors and decorations, you can make the cake as unique as the graduate themselves.
The key is to have fun with the process after all, this cake is about celebrating achievement and making memories that will last a lifetime. Whether you stick to a classic design or get inventive with your graduation-themed decorations, your cake will surely impress your guests and leave everyone with a sweet taste of success.
So, the next time you’re planning a graduation celebration, remember that a graduation cake isn’t just about feeding people it’s about making the day feel even more memorable. Get baking, get creative, and enjoy every moment of the process!
This cake isn’t just a dessert; it’s a piece of the celebration, and with this recipe, you’re sure to create a masterpiece. Happy baking and congratulations to all the graduates!
Graduation Cake
Ingredients
For the Cake:
- 2 ½ cups all-purpose flour
- The base of your cake. You can use cake flour for a finer texture but all-purpose works perfectly well for a sturdy yet tender cake.
- 2 ½ teaspoons baking powder
- This will help your cake rise and get that light fluffy texture that’s perfect for layering.
- 1 teaspoon salt
- To balance out the sweetness and enhance the flavors.
- 1 cup unsalted butter softened
- The richness of butter is key to achieving a moist flavorful cake. Make sure it’s softened for easy mixing.
- 2 cups granulated sugar
- Sweetness is the star here but don’t worry, the frosting will balance things out beautifully.
- 4 large eggs
- Eggs help bind everything together and provide moisture and structure.
- 1 tablespoon vanilla extract
- For that subtle comforting flavor that pairs so well with any cake.
- 1 cup whole milk
- The milk adds moisture and a tender crumb to the cake so don’t skimp here.
For the Frosting:
- 1 ½ cups unsalted butter softened
- Yes more butter! This makes the frosting creamy and luxurious.
- 4 cups powdered sugar
- Sweet and fluffy frosting requires powdered sugar for that smooth spreadable consistency.
- 2 teaspoons vanilla extract
- You can’t go wrong with the comforting taste of vanilla in the frosting.
- 2-3 tablespoons heavy cream or whole milk
- This helps adjust the consistency of the frosting making it easy to spread and pipe.
For Decoration:
- Fondant or Buttercream your choice
- You can decorate with either fondant for a sleek smooth finish or buttercream for a softer, homemade look. Both will work perfectly for creating a gorgeous graduation cap or other themed decorations.
- Graduation-themed cake toppers optional
- If you want to take your decoration game to the next level add some fun graduation-themed cake toppers like tiny diplomas or a mortarboard cap. This adds a personal, celebratory touch to your cake.
- Sprinkles edible glitter, or fresh flowers
- For a bit of extra sparkle you can top your cake with a sprinkle of edible glitter or fresh flowers, making it look even more festive and eye-catching.
Instructions
Step 1: Prep Your Pans and Preheat the Oven
- Before you begin mixing, it’s important to prep your baking tools. Start by preheating your oven to 350°F (175°C). This ensures your cake bakes evenly. Next, grease your cake pans with butter and lightly dust them with flour, or line them with parchment paper. This prevents your cake from sticking and makes for an easy release once baked.
Step 2: Mix Your Cake Batter
- In a large mixing bowl, cream together the softened unsalted butter and granulated sugar until the mixture is light and fluffy. This should take about 3-4 minutes with an electric mixer on medium speed. Once creamy, add the eggs, one at a time, mixing well after each addition. Make sure the eggs are fully incorporated before adding the next.
- Next, sift your cake flour and baking powder together in a separate bowl to ensure they are evenly distributed. Gradually add the dry ingredients to the wet mixture, alternating with whole milk. Start and end with the dry ingredients. Mix gently until the batter is smooth and fully combined don’t overmix!
Step 3: Bake the Cake Layers
- Divide the batter evenly between your prepared cake pans. Use a spatula to smooth the tops. Bake in your preheated oven for 25-30 minutes, or until a toothpick inserted into the center of the cakes comes out clean. Every oven is different, so start checking around 20 minutes to avoid overbaking. Once done, remove the cakes from the oven and allow them to cool in the pans for 10 minutes. Then, turn them out onto a wire rack to cool completely.
Step 4: Make the Buttercream Frosting
- While the cakes are cooling, let’s get started on the frosting. In a large bowl, beat together the softened unsalted butter and powdered sugar until smooth and creamy. Add a pinch of salt to balance the sweetness. Gradually add heavy cream and vanilla extract, beating until the frosting reaches your desired consistency smooth, fluffy, and spreadable.
- For a more stable frosting (great for decorating), add more powdered sugar. For a softer texture, add a little more cream. If you want to get a little creative, you can tint the frosting with food coloring to match the graduation theme or even use different shades for a multi-colored effect.
Step 5: Assemble Your Graduation Cake
- Now for the fun part assembly! Place the first layer of your cooled cake on a serving platter or cake board. Spread a generous layer of frosting on top, smoothing it out to the edges. Add the second cake layer and gently press down to level it. Frost the top and sides of the cake, smoothing it out as you go.
- If you want a more polished look, you can use a fondant covering for a sleek finish, or pipe decorative borders with your frosting for a more textured effect. Be sure to have fun with it and personalize the design. This is your chance to get creative and make the cake truly special for the graduate.
Step 6: Decorate with Graduation Touches
- Once your cake is frosted, it’s time for the graduation-themed decorations. You can use fondant to create graduation caps, scrolls, or even the year of graduation in numbers. A sprinkle of edible glitter or gold leaf adds a touch of elegance. For an extra personal touch, top the cake with a custom graduation topper perhaps the graduate’s name, school logo, or a fun quote about the next chapter.
- And there you have it! A beautiful, delicious graduation cake ready to take center stage at your celebration. Remember, this recipe is just a starting point feel free to tweak it to suit your style and tastes. Whether you’re a seasoned baker or a first-timer, following these steps will help you craft a cake that’s as memorable as the graduation day itself. Enjoy the process and, of course, the cake!
Notes
- Calories: 350 kcal
- Fat: 18g
- Saturated Fat: 9g
- Carbohydrates: 45g
- Dietary Fiber: 1g
- Sugars: 35g
- Protein: 3g
- Cholesterol: 55mg
- Sodium: 210mg
- Potassium: 125mg
- Vitamin A: 6% DV
- Calcium: 2% DV
- Iron: 4% DV
7. FAQs About Graduation Cakes

When it comes to baking and decorating your graduation cake, there are often a few common questions that arise. Whether you’re a seasoned baker or trying your hand at making your first graduation cake, this FAQ section is here to clear up any doubts and offer some helpful tips. Let’s dive in!
1. How far in advance can I make a graduation cake?
You can absolutely prepare your graduation cake ahead of time! Here’s how:
Cake Layers: Bake your cake layers 1-2 days in advance and store them in an airtight container at room temperature. If you’re making a multi-layered cake, you can wrap each layer in plastic wrap to keep them moist.
Frosting: You can make the frosting up to a week in advance and store it in an airtight container in the fridge. Just give it a good stir before using it to ensure it’s smooth and spreadable.
Assembling the Cake: Assemble your cake the day before the event or the morning of the celebration. This gives you plenty of time to focus on the other details of the party!
2. Can I make a graduation cake without fondant?
Absolutely! While fondant gives your cake a smooth, polished look, it’s not necessary. You can create a beautiful graduation cake using buttercream frosting or whipped cream, both of which are just as delicious. If you prefer a more textured design, you can use piping tips to add borders, rosettes, or even fun designs like stars, hearts, or the graduate’s initials.
If you still want to incorporate fondant decorations like graduation caps or diplomas, you can make those separately and attach them to the cake later.
3. How can I make my graduation cake gluten-free?
Making your graduation cake gluten-free is simple! All you need to do is substitute the all-purpose flour with a gluten-free flour blend. Make sure to choose a good quality, all-purpose gluten-free flour that contains xanthan gum, which helps with texture. Additionally, double-check your baking powder to ensure it’s gluten-free.
If you’re using frosting or decorations, they’re typically gluten-free, but always read labels to be sure, especially when it comes to pre-made decorations or colorings.
4. How can I ensure my cake layers bake evenly?
A common issue when baking cakes is uneven layers. Here are a few tips to make sure your graduation cake layers turn out perfect every time:
Evenly distribute the batter: Use an ice cream scoop or measuring cup to evenly divide the batter between your cake pans.
Level the cake batter: Once the batter is in the pans, use a spatula to smooth the tops and ensure an even surface.
Baking strips: If you want to get extra professional, you can use baking strips around your pans to promote even baking and avoid domed cake tops. These strips help to cool the edges of the pan more slowly, so the cake rises more evenly.
5. Can I make the cake layers ahead of time and freeze them?
Yes, you can freeze your cake layers! Here’s how:
After baking the layers and letting them cool completely, wrap each cake layer tightly in plastic wrap and then in foil. This helps preserve the moisture and prevents freezer burn.
Store the wrapped cakes in an airtight container and freeze for up to 3 months.
When you’re ready to assemble, let the cakes thaw at room temperature for about 1-2 hours before frosting. This will help them stay moist and fluffy.
6. What should I do if my cake cracks or sinks in the middle?
If your cake cracks or sinks in the middle, don’t worry it happens to the best of us! Here’s what you can do:
Cracking: This can happen if the oven temperature is too high or if the cake was overbaked. For next time, make sure to check your oven’s temperature with an oven thermometer and bake your cake layers until a toothpick comes out clean but not too dry.
Sinking in the middle: This is often due to underbaking. Make sure your cake is fully cooked by checking it with a toothpick or cake tester. If the middle sinks after baking, try trimming it flat once cooled and covering it with a generous amount of frosting to hide the imperfection.
7. How can I decorate my graduation cake without being a pro?
Don’t worry if you’re not a cake decorating expert! There are plenty of simple but stunning ways to decorate your graduation cake:
Piping: Use a simple piping bag and a round or star tip to add some quick decorative touches, like a border or rosettes.
Edible Decorations: You can buy graduation-themed decorations like toppers, edible gold leaf, or sprinkles to add instant flair to your cake without needing professional skills.
Personalized Touches: Incorporate a custom graduation topper with the graduate’s name, graduation year, or school logo. This can be a fun, personalized way to make the cake extra special.
These FAQs should help clear up any doubts and give you the confidence to bake and decorate your graduation cake like a pro. Whether you’re making it ahead of time, choosing the right decorations, or adjusting for dietary needs, you’ve got the tools to create a cake that will make the celebration truly unforgettable. Happy baking, and enjoy the sweet moments of your graduate’s big day!