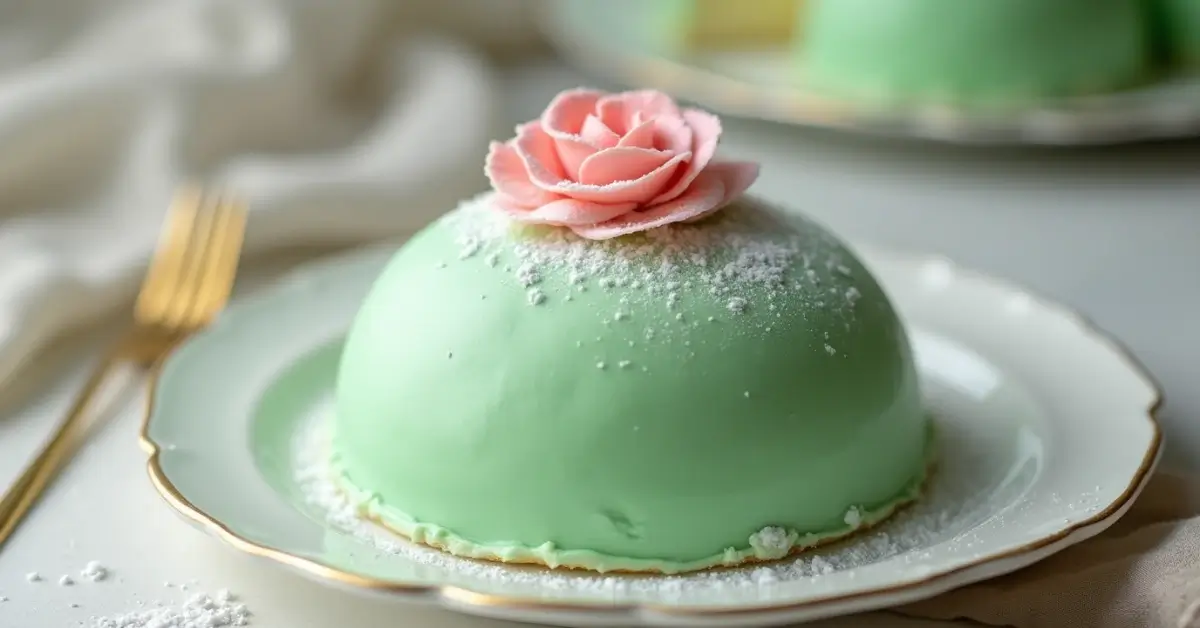
If you’re searching for a dessert that combines elegance, flavor, and a bit of Swedish tradition, look no further than the Princess Cake. This Swedish princess cake, or prinsesstårta, is a crowd-pleaser with its layers of light sponge cake, smooth pastry cream, and the irresistible sweetness of whipped cream. The finishing touch? A gorgeous dome of green marzipan, making it as delightful to the eyes as it is to the taste buds. Whether you’re celebrating a special occasion or just treating yourself to something luxurious, this cake will undoubtedly stand out.
What makes this cake truly magical is its versatility perfect for a festive gathering, a tea party, or simply as a weekend indulgence. And with its balance of flavors, from the raspberry jam to the creamy layers, each bite is a little piece of heaven. Ready to create a dessert that’s as fun to make as it is to eat? Let’s dive into the recipe and bring this delicious treat to life!
Table of Contents
Why You’ll Love This Princess Cake Recipe
There’s something truly magical about creating a Princess Cake it’s not just the beauty of the green marzipan dome or the layers of whipped cream and pastry cream, but the joy it brings to those who get to indulge in each bite. Whether you’re making it for a special occasion or as a sweet treat for yourself, this cake offers a unique combination of flavors and textures that will impress everyone at the table.
Here’s why this recipe stands out:
- Elegance and Simplicity: The Princess Cake is deceptively simple to make but looks like a showstopper. The soft, airy layers of sponge cake are paired with a luscious vanilla custard filling and topped with a smooth, marzipan dome, making it as stunning as it is delicious.
- Perfect for Any Occasion: From birthdays to holiday gatherings, this Swedish princess cake (or prinsesstårta) will steal the show. The vibrant color of the green marzipan creates a festive feel, and the combination of whipped cream, raspberry jam, and pastry cream is a hit with both kids and adults alike. If you’re in the mood for another stunning cake that captures elegance and charm, check out our Stunning Vintage Heart Cake for another delightful treat that’s perfect for special occasions.
- Flavorful Layers: Each bite of this cake offers something different. The layers of sponge cake provide a light, delicate base, while the raspberry jam adds a tangy twist that perfectly complements the sweetness of the whipped cream and the richness of the pastry cream. It’s a balance of flavors that feels indulgent but not overwhelming.
- Fun to Make: Baking this cake is as enjoyable as eating it! From whipping up the fluffy whipped cream to kneading the marzipan and decorating with a dusting of powdered sugar, you’ll love the hands-on process. It’s a great way to spend time in the kitchen, especially when you have someone to share it with.
Pro Tips for Success:
- Whisking the Eggs: When making the sponge cake, make sure to whisk the eggs and sugar until they’re thick and pale.
- Chill Your Cake Layers: Once your cake is baked and cooled, wrap it in plastic wrap and refrigerate it overnight. This makes the layers easier to cut and adds a touch of moisture.
- Gelatin in Whipped Cream: For perfectly stable whipped cream, adding a little gelatin ensures it holds its shape when decorating the cake. It’s a simple trick that will make a big difference in your final presentation.
With all these tips and tricks, you’re sure to create a delicious and beautiful cake that everyone will love. Ready to start? Let’s move on to the ingredients!
Ingredients for the Princess Cake
Before you dive into creating your Princess Cake, let’s take a look at what you’ll need. This cake is all about creating the perfect balance of flavors and textures from the fluffy sponge cake to the silky pastry cream and the smooth marzipan dome. Here’s everything you need to get started:
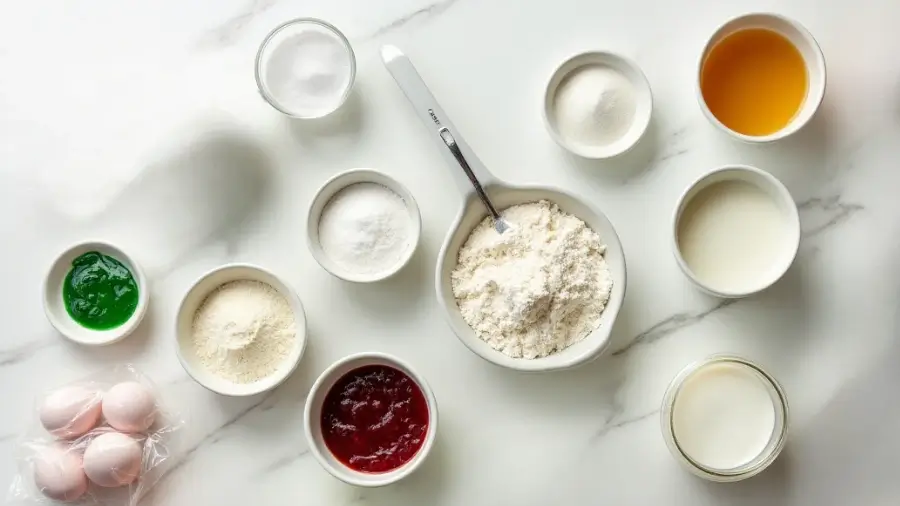
For the Sponge Cake:
- 4 large eggs
- 1 cup sugar
- 1/2 cup flour
- 1/2 cup cornstarch or potato flour
- 1 teaspoon baking powder
- 1/8 teaspoon salt
For the Vanilla Custard Filling:
- 1 cup whole milk
- 4 egg yolks
- 2 tablespoons cornstarch
- 1/4 cup granulated sugar
- 1 teaspoon vanilla extract
For the Stabilized Whipped Cream:
- 1 envelope (0.25 oz.) powdered unflavored gelatin
- 2 tablespoons cold water
- 2 cups heavy cream, whipped
- 1/4 cup powdered sugar
- 1 teaspoon vanilla extract
For the Assembly:
- 1/3 cup raspberry jam
- Powdered sugar for dusting
- 1 lb. prepared marzipan
- Leaf green food color
- Ready-made rose icing decorations (optional)
- Baker’s rose food color (optional)
Key Ingredients You Won’t Want to Miss:
- Marzipan: This sweet almond paste is what gives the Princess Cake its signature smooth dome shape and sweet flavor. Don’t skimp on it!
- Raspberry Jam: The tangy raspberry jam tucked between the layers of sponge cake adds a lovely contrast to the sweetness of the cream and marzipan.
- Stabilized Whipped Cream: This step is key to getting that perfect dome of whipped cream that holds up beautifully when you assemble your cake.
A Few Tips Before You Start:
- Sponge Cake: Be sure to beat the eggs and sugar until they’re light and fluffy. This helps achieve the airy, delicate texture of the cake that makes the Princess Cake so special.
- Marzipan: If your marzipan feels too stiff, warm it up slightly with your hands to make it more pliable. This will help you roll it out easily and cover the cake smoothly.
- Stabilized Whipped Cream: The gelatin is essential for keeping the whipped cream firm, especially if you’re making this cake ahead of time. It ensures that your whipped cream holds its shape, even as the cake sits in the fridge.
With all these ingredients in place, you’re ready to start bringing your Princess Cake to life! Let’s move on to the next step and begin making this beautiful dessert.
Step by Step Instructions for the Princess Cake
Now that you’ve gathered your ingredients, it’s time to roll up your sleeves and get baking! Don’t worry this Princess Cake recipe may look intricate, but I’ll guide you through each step with plenty of tips and tricks. Let’s get started!
1. Prepare the Sponge Cake:
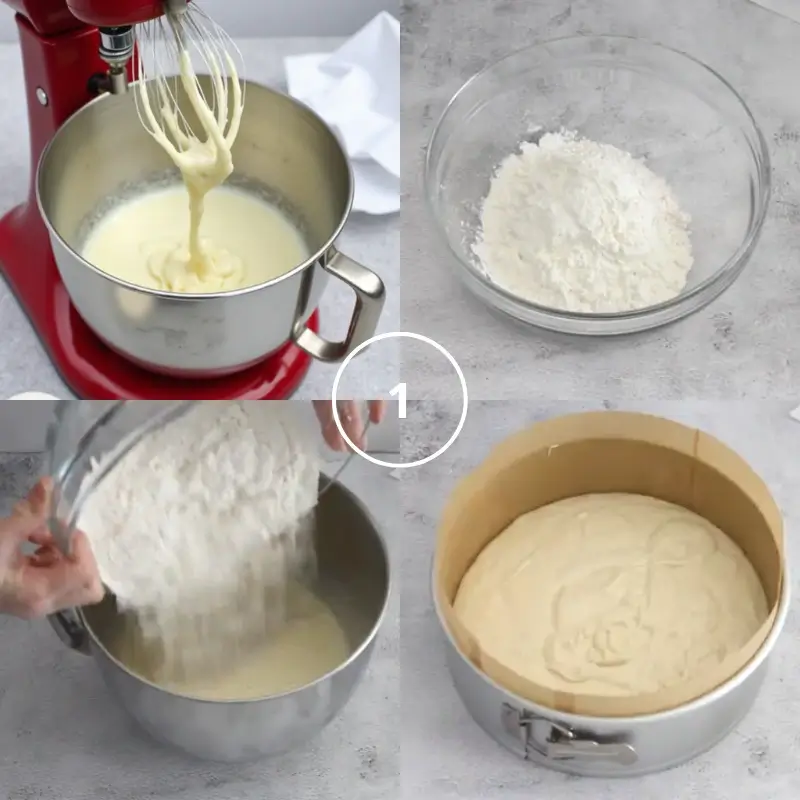
- Preheat the oven to 350°F (175°C). Lightly grease a 9-inch round springform pan and line it with parchment paper to ensure easy removal of the cake.
- In a mixing bowl, beat the eggs and sugar together on high speed until pale and thick. The mixture should triple in volume, and when you lift the whisk, the batter should fall in a ribbon, leaving a trail on the surface. This takes about 5 minutes.
- In another bowl, combine the flour, cornstarch, baking powder, and salt, whisking them together thoroughly.
- Gently fold the dry mixture into the beaten eggs and sugar. Be careful not to deflate the batter this is what gives your cake its light and airy texture.
- Transfer the batter into the prepared pan, using a spatula to level the surface evenly.
- Bake for 27-30 minutes, checking with a toothpick inserted into the center when it comes out clean, the cake is ready. Let the cake cool in the pan for a few minutes, then remove the springform collar. Peel away the parchment paper and let the cake cool completely on a wire rack.
2. Make the Vanilla Custard Filling:
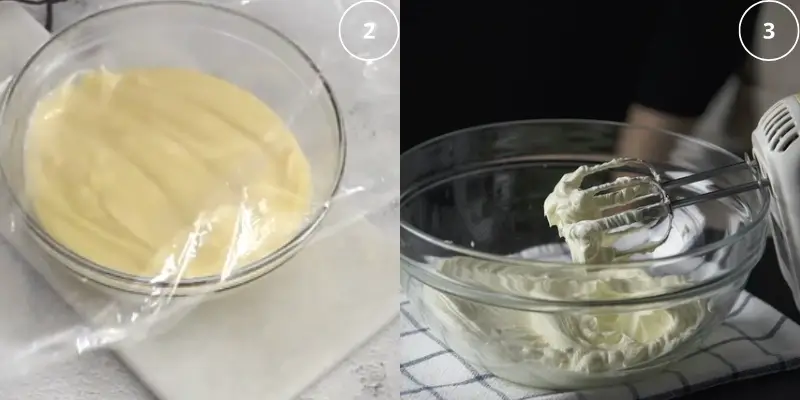
- In a small saucepan, whisk together the milk, egg yolks, cornstarch, and sugar over medium heat. Keep whisking continuously until the mixture thickens. As soon as it starts to thicken, remove it from the heat and stir in the vanilla extract.
- Transfer the custard to a bowl and press a piece of plastic wrap directly onto the surface to prevent a skin from forming. Let it cool and then refrigerate until firm, about 2 hours.
3. Prepare the Stabilized Whipped Cream:
- Add the gelatin to the cold water in a small bowl and let it sit for a few minutes to hydrate.
- In a mixing bowl, whip the heavy cream on medium speed until soft peaks form. Slowly incorporate the powdered sugar and vanilla extract into the mixture.
- Heat the gelatin in the microwave for about 5-7 seconds until it melts completely. While the mixer is running, slowly add the gelatin to the whipped cream. Continue beating until stiff peaks form. Set aside 1/2 cup of whipped cream for later.
4. Assemble the Cake:

- Carefully slice the cooled sponge cake into three even layers using a serrated knife.
- Place the first layer of cake on your serving plate or cake board. Evenly spread a light layer of raspberry jam on top.
- Add half of the cooled vanilla custard filling, spreading it evenly with a spatula.
- Place the second layer of cake on top and repeat the process with the remaining custard and jam.
- Spread the stabilized whipped cream over the top layer of cake, using a spatula to form a dome shape.
- Gently place the final cake layer on top, pressing down to smooth the edges and shape the cake into a dome.
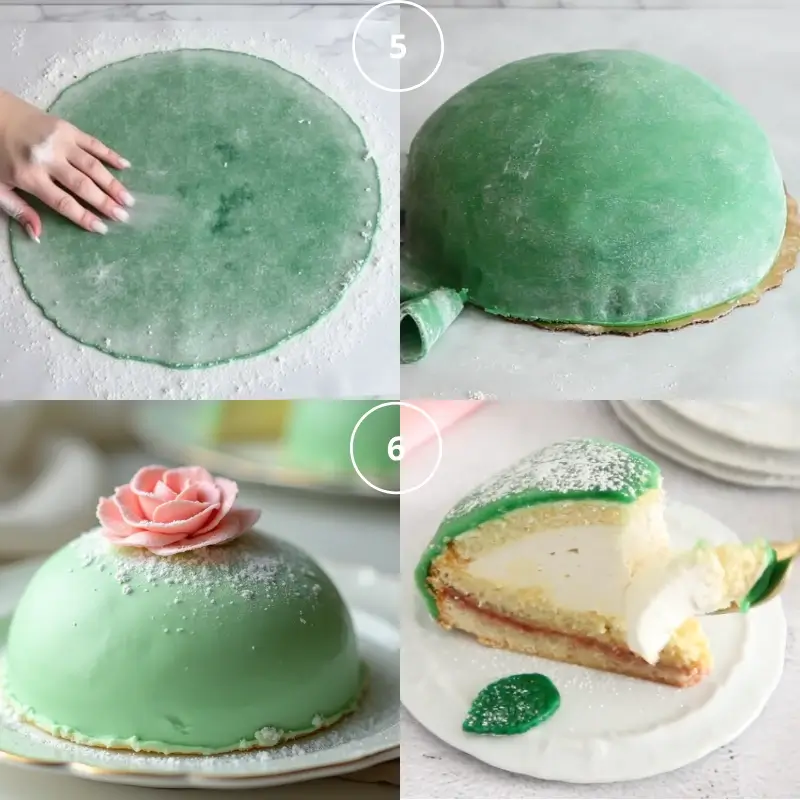
5. Cover with Marzipan:
- Knead the marzipan to soften it, adding a tiny bit of green food coloring to create a soft green hue.
- Roll the marzipan out on a powdered sugar-dusted surface into a circle large enough to cover your cake.
- Carefully drape the marzipan circle over the cake, gently pressing it into place and smoothing the top and sides.
- Trim any excess marzipan from the bottom and tuck the edges neatly under the cake.
6. Decorate and Final Touches:
- To finish, use the reserved whipped cream to pipe decorations or add extra texture to the top of the cake.
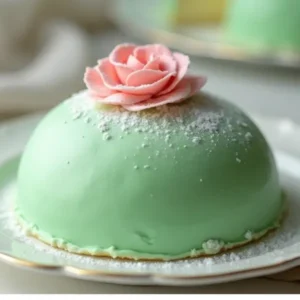
- If desired, decorate the cake with ready-made rose icing decorations and a light dusting of powdered sugar for an extra touch of elegance.
7. Refrigerate:
- Once your cake is fully assembled and decorated, place it in the fridge to set for at least one hour, or preferably overnight. This allows the flavors to meld and the cake to firm up beautifully.
Tips for Success:
- Cooling the Cake Layers: Be patient with cooling the sponge cake before cutting it. This helps prevent crumbling and makes it easier to handle when assembling.
- Gelatin in Whipped Cream: Don’t skip the gelatin step! It’s what keeps your whipped cream stable, ensuring it won’t collapse during decoration.
- Marzipan Handling: If the marzipan gets too sticky while rolling, just dust your surface with a little extra powdered sugar. It will help prevent sticking and make the process much smoother.
Pro Tips and Variations for the Princess Cake
Now that you’ve made your Princess Cake, let’s talk about ways to take this already incredible dessert to the next level! Here are some tips and variations to ensure your cake turns out perfectly and allows for a little creative flair.
Pro Tips for Perfecting Your Princess Cake:
- Whisk the Eggs Properly: When making the sponge cake, it’s essential to whisk the eggs and sugar until they are pale and tripled in volume. This is the key to achieving a light and fluffy texture. If you don’t beat them enough, your cake might turn out dense instead of airy.
- Marzipan Handling: Marzipan can be a bit tricky to work with. If it’s too stiff, knead it with your hands until it softens. If it becomes sticky, just dust your work surface with a bit of powdered sugar. This will make rolling it out much easier and prevent it from sticking.
- Stabilizing Whipped Cream: Adding gelatin to your whipped cream is a game-changer. It helps the cream hold its shape for longer, even when the cake is sitting out. Plus, it ensures your dome of whipped cream stays perfect while you decorate and serve. If you’re short on time, you can skip the gelatin, but it will help if you’re planning to make the cake in advance.
- Layering: When assembling the cake, make sure the layers of cake are evenly sized, especially when you’re slicing the sponge cake. Uneven layers can affect how the cake sits and might make the marzipan a bit uneven as well. You can always use a serrated knife to carefully cut the layers.
- Chill Before Cutting: After assembling your cake, it’s best to refrigerate it for at least an hour or even overnight before serving. This allows all the flavors to meld together and helps the cake firm up, making it easier to slice.
Creative Variations:
While the traditional Princess Cake is divine, feel free to get creative with the flavors and presentation! Here are some fun ideas:
- Flavor Variations: While raspberry jam is the classic choice, you can swap it out for other fruit preserves like strawberry or apricot. Or, for a more indulgent twist, add a layer of chocolate ganache between the cake layers for extra richness.
- Nutty Twist: Add a little extra crunch by sprinkling chopped almonds or hazelnuts between the layers of sponge cake or even on top of the whipped cream before adding the marzipan. The nutty flavor complements the sweetness of the whipped cream and marzipan beautifully.
- Flavored Whipped Cream: For a more exciting flavor, try infusing your whipped cream with a little lemon zest or a few drops of almond extract. This gives the whipped cream a little extra depth and ties in nicely with the marzipan.
- Mini Princess Cakes: Want to make individual servings? You can make mini Princess Cakes by baking smaller cakes in individual pans or using a round cookie cutter to cut out smaller portions of the sponge cake. This makes for a fun presentation at a party or event.
- Decorative Touches: Feel free to get creative with your decorations! Use extra marzipan to make little flowers or shapes, and decorate the top of the cake with colorful icing decorations or edible gold leaf for an added touch of elegance.
Tips for Success:
- Use Fresh Ingredients: Fresh eggs, cream, and vanilla extract will make a noticeable difference in flavor. It’s worth spending a little extra for high-quality ingredients for a cake like this.
- Keep it Moist: If you’re making the cake ahead of time, don’t forget to wrap it tightly in plastic wrap to prevent it from drying out. The marzipan layer will help seal in the moisture, keeping the cake fresh.
With these pro tips and variations, you can make your Princess Cake uniquely your own while ensuring it’s a perfect treat every time. Now that you’ve mastered the basic recipe, it’s time to start getting creative!
Serving Suggestions for Your Princess Cake
Now that your Princess Cake is beautifully assembled and ready to go, it’s time to think about how to serve it. This cake is perfect for a variety of occasions, and with the right presentation, you’ll have a showstopper that everyone will rave about. Here are some serving suggestions to make your Swedish princess cake even more memorable:
1. Chilled Perfection:
- Serve chilled: After spending time in the fridge to set, your Princess Cake should be served cold to maintain its firmness and allow the flavors to meld together. The whipped cream and pastry cream will stay smooth and luscious, while the marzipan will maintain its perfect texture.
2. Presentation Ideas:
- Elegant Cake Stand: For the best presentation, place your cake on a beautiful cake stand or decorative platter. The green marzipan dome will really pop, and a simple, elegant cake stand elevates the look. If you’re in the mood for another beautifully presented cake, try our Heart-Shaped Cake, which makes a lovely alternative for a special occasion or romantic gathering.
- Dust with Powdered Sugar: Before serving, lightly dust the top of the cake with powdered sugar for a delicate, elegant touch. It adds a beautiful finish, especially when you’re ready to slice the cake.
- Garnish with Edible Flowers: To add a pop of color and elegance, garnish the top with edible flowers. Choose simple white or pastel-colored flowers to complement the green marzipan.
3. Pair with Drinks:
- Tea: A classic pairing for Princess Cake is a lovely pot of tea. A delicate Earl Grey or green tea complements the sweetness of the cake and provides a refreshing contrast.
- Coffee: If you’re serving this cake for an afternoon treat, a nice cup of coffee or espresso works wonderfully with the rich whipped cream and raspberry jam.
4. For a Special Touch:
- Mini Versions: If you’re serving a crowd or want to give your guests a fun experience, consider making mini Princess Cakes. You can bake smaller individual portions or use a cookie cutter to create little round cakes, perfect for a tea party or festive gathering.
- Themed Decor: If you’re celebrating a special occasion, consider using themed decorations on the plate or around the cake. Small edible gold leaf, silver beads, or decorative ribbons can make the cake look even more luxurious.
5. Leftover Storage:
- Store in the Fridge: Any leftover Princess Cake should be stored in an airtight container in the fridge. It will stay fresh for up to 3-4 days, and the flavors will only get better as the cake sits.
- Refrigerate Individually Wrapped Slices: For easy storage, wrap leftover slices in plastic wrap or place them in small containers so that they are easy to grab and enjoy later.
Why Serve a Princess Cake?
This cake is perfect for a special occasion, whether it’s a birthday, a tea party, or a family gathering. The layers of sponge cake, whipped cream, and marzipan make it a delightful treat that’s both festive and delicious. Not to mention, it’s a real showstopper!
With these serving suggestions, your Princess Cake will not only taste amazing but look incredible too. Ready to enjoy this stunning dessert with your loved ones? Let’s dig in!
Conclusion: Enjoy Your Princess Cake!
Congratulations! You’ve made your very own Princess Cake, and now it’s time to savor the fruits of your labor. With its layers of light sponge cake, creamy pastry cream, tangy raspberry jam, and the finishing touch of green marzipan, this Swedish princess cake is as delicious as it is beautiful. This cake is ideal for any occasion, whether you’re marking a special celebration or just treating yourself to something sweet.
Why This Cake Is So Special:
- Flavors That Sing: From the sweet and tangy raspberry jam to the rich whipped cream and smooth pastry cream, every bite offers something new. The marzipan dome adds a unique texture that perfectly balances the cake’s sweetness.
- Elegant Yet Simple: Even though this cake might look intricate, it’s surprisingly simple to make. Once you get the hang of layering the cake, filling it with custard, and covering it with marzipan, you’ll find yourself making this showstopper time and time again.
- A Showstopper: Not only is this cake delicious, but it’s also a visual masterpiece. The vibrant green marzipan dome and the whipped cream topping create a stunning centerpiece that will wow your guests and leave them asking for seconds.
A Few Final Tips:
- Make Ahead: This cake actually gets better after a little time in the fridge! If you’re planning to make it ahead of time, simply store it in the fridge for up to 3-4 days. The flavors meld beautifully and the texture stays fresh.
- Perfect for Any Celebration: Whether it’s a birthday, a special gathering, or an afternoon tea, the Princess Cake adds a touch of elegance to any event.
- Customize It: As you get more comfortable with the recipe, don’t hesitate to play with the flavors or decorations. Try different fruit jams, infuse your whipped cream with a hint of almond extract, or even add a touch of chocolate between the layers for a twist!
This Princess Cake is a recipe you can be proud of, and I’m sure it will become a favorite in your baking repertoire. It’s a delightful combination of texture, flavor, and elegance that’s guaranteed to impress. Enjoy every slice and don’t forget to share it with the people you love!
Princess Cake Recipe
Ingredients
For the Sponge Cake:
- 4 large eggs
- 1 cup sugar
- 1/2 cup flour
- 1/2 cup cornstarch or potato flour
- 1 teaspoon baking powder
- 1/8 teaspoon salt
For the Vanilla Custard Filling:
- 1 cup whole milk
- 4 egg yolks
- 2 tablespoons cornstarch
- 1/4 cup granulated sugar
- 1 teaspoon vanilla extract
For the Stabilized Whipped Cream:
- 1 envelope 0.25 oz. powdered unflavored gelatin
- 2 tablespoons cold water
- 2 cups heavy cream whipped
- 1/4 cup powdered sugar
- 1 teaspoon vanilla extract
For the Assembly:
- 1/3 cup raspberry jam
- Powdered sugar for dusting
- 1 lb. prepared marzipan
- Leaf green food color
- Ready-made rose icing decorations optional
- Baker’s rose food color optional
Instructions
- Preheat the oven to 350°F (175°C). Lightly grease a 9-inch round springform pan and line it with parchment paper to ensure easy removal of the cake.
- Prepare the sponge cake: In a large bowl, beat the eggs and sugar together until pale and thick, about 5 minutes.In another bowl, combine the flour, cornstarch, baking powder, and salt. Carefully incorporate the dry ingredients into the egg mixture, folding gently to maintain the airiness. Pour the batter into the pan and bake for 27-30 minutes or until a toothpick inserted into the center comes out clean. Let cool.
- Make the vanilla custard: In a saucepan, whisk the milk, egg yolks, cornstarch, and sugar over medium heat. Stir constantly until the mixture thickens. Remove from heat and stir in the vanilla extract. Let cool completely in the fridge for 2 hours.
- Prepare the stabilized whipped cream: Sprinkle gelatin over water and let it sit for a few minutes. Using a mixer, beat the heavy cream until soft peaks begin to form. Gradually add powdered sugar and vanilla extract. Heat the gelatin in the microwave until melted, then slowly add it to the whipped cream. Beat until stiff peaks form. Set aside 1/2 cup for decoration.
- Assemble the cake: Cut the cooled sponge cake into three equal layers. Place the first layer on a cake board or serving platter. Spread raspberry jam and then half of the custard. Place the second layer of cake, followed by the remaining custard. Top with whipped cream and shape into a dome. Place the final cake layer on top and press to secure.
- Cover with marzipan: Knead the marzipan with green food coloring until it’s soft and evenly colored. Roll it out on a powdered sugar-dusted surface into a large circle. Drape the marzipan over the cake, smoothing out wrinkles and tucking in the edges. Trim excess marzipan from the bottom.
- Decorate: Pipe the reserved whipped cream onto the cake, or add icing decorations for a festive touch. Lightly sprinkle powdered sugar on top for a refined, elegant touch.
- Chill the cake in the fridge for at least 1 hour before serving. Slice and enjoy!
Notes
Nutrition Information (per serving):
- Calories: 475
- Fat: 24g
- Saturated Fat: 5g
- Cholesterol: 50mg
- Sodium: 60mg
- Carbs: 63g
- Fiber: 2g
- Sugar: 43g
- Protein: 4g
Frequently Asked Questions About Princess Cake
As you get ready to bake and enjoy your Princess Cake, there may be a few lingering questions about its origins, storage, or customization. Let’s dive into some of the most common inquiries to make sure you’re fully prepared for a delicious experience.
1. Why is it called a Princess Cake?
The Princess Cake, or Prinsesstårta in Swedish, got its name from Swedish royalty. It’s said to have been named after Princess Margaret of Sweden, who was the first to taste and love this cake. Its elegant appearance, featuring a soft green marzipan dome, perfectly reflects its royal heritage.
2. What is the difference between Princess Cake and Prince Cake?
The main difference between Princess Cake and Prince Cake is the color of the marzipan. While Princess Cake traditionally uses green marzipan, the Prince Cake is typically covered in blue marzipan, offering a fun, masculine twist on the classic dessert. Both cakes share similar layers and flavors, but the color sets them apart!
3. What country is known for Princess Cake?
The Princess Cake is a beloved dessert in Sweden, where it originated. It’s a traditional Swedish dessert, often served at birthdays, special occasions, and holidays. Its popularity has spread across the globe, becoming a favorite for anyone who enjoys elegant, delicious cakes.
4. Is Princess cake always green?
Traditionally, yes! The Princess Cake is known for its iconic green marzipan dome, but the beauty of this cake is that it’s customizable. You can experiment with different marzipan colors like pink, blue, or even yellow for various occasions. While green is the classic look, feel free to make it your own.
5. Can you freeze a Princess Cake?
Yes, you can freeze a Princess Cake, but with a few considerations. It’s best to freeze the cake without the marzipan layer if possible, as it may lose its smooth texture. If you need to freeze the whole cake, make sure to wrap it tightly in plastic wrap and store it in an airtight container. When you’re ready to enjoy it, allow it to thaw in the fridge and then add the marzipan and decorations afterward.
6. Should Princess cake be refrigerated?
Absolutely! Princess Cake contains both whipped cream and pastry cream, so it should be stored in the fridge to maintain freshness. Refrigerating it helps preserve the delicate whipped cream and keeps the marzipan firm. For the best experience, serve it chilled so the flavors can blend together perfectly.
7. What color is a Princess Cake?
While the classic Princess Cake is green due to the marzipan coating, it can be made in a variety of colors depending on personal preferences or the occasion. The cake itself, however, retains its light, golden sponge cake layers and creamy fillings, with the marzipan providing a vibrant contrast.
8. How long does Princess Cake last?
If stored properly in the fridge, Princess Cake will stay fresh for up to 3-4 days. After that, the whipped cream and custard filling may begin to lose their texture. It’s always best to enjoy it within the first few days for the best flavor and consistency.
9. Can I make Princess Cake in advance?
Yes, you can make parts of the cake in advance. The sponge cake can be baked a day ahead, and the whipped cream and custard filling can be prepared in advance and stored separately in the fridge. When you’re ready to assemble the cake, all the components will be ready to go, saving you time on the day you plan to serve it.
10. What is the texture of Princess Cake like?
The Princess Cake has a light, airy texture due to its fluffy sponge cake layers. The pastry cream and whipped cream add richness and smoothness, while the marzipan provides a slightly chewy contrast. Each bite is a delightful combination of soft, creamy, and slightly nutty flavors, with the raspberry jam adding a sweet and tangy note.
With these FAQs, you’re fully equipped to make the most of your Princess Cake experience. Whether you’re crafting it for the first time or perfecting your technique, I hope these answers guide you along the way. Enjoy the process and more importantly, enjoy every delicious bite of your gorgeous Princess Cake!